Dieser Beitrag wurde am 06.10.2024 aktualisiert.
Wenn ihr auch Fritzbox Smarthome nutzt, werdet ihr wahrscheinlich schon eine Funktion vermissen, zumindest ging es mir so. Es geht um eine Anwesenheitserkennung.
Inhaltsverzeichnis
Wie?
Die Anwesenheitserkennung habe ich mit einem ESP8266 und einem Fritzbox-Taster (DECT 400) realisiert. Der ESP8266 fragt über das TR-064 Protokoll die Fitzbox nach den MAC-Adressen der aktuell angemeldeten Geräte ab. Im Sktech werden dann mehrere Geräte hinterlegt, die überwacht werden sollen. In meinem Fall wird jede Minute überprüft, ob die betreffenden Geräte im Netzwerk angemeldet sind. Ändert sich der Status eines der Geräte wird dementsprechend der digitale Ausgang des ESP gesetzt. Nach diesem Prinzip könnte man auch alles andere mit dem ESP8266 steuern, was der Fritzbox-Taster steuern kann.
Warum so?
Man könnte das ganze auch komplett ohne Hardware umsetzen, denn über ein HTTP Interface kann man das Smarthome der Fritzbox auch ansteuern. Mit dem ESP8266 habe ich das noch nicht umsetzen können. Dies ist also „nur“ eine Übergangslösung, die allerdings sehr gut funktioniert.
Hardware
Zur Hardware gibt es nicht viel zu sagen: Sie besteht aus dem Fritzbox-Taster Dect 400, einem ESP8266-01 und einem 3,3V Spannungsregler sowie zwei Kondensatoren. Unten seht ihr den Schaltplan.
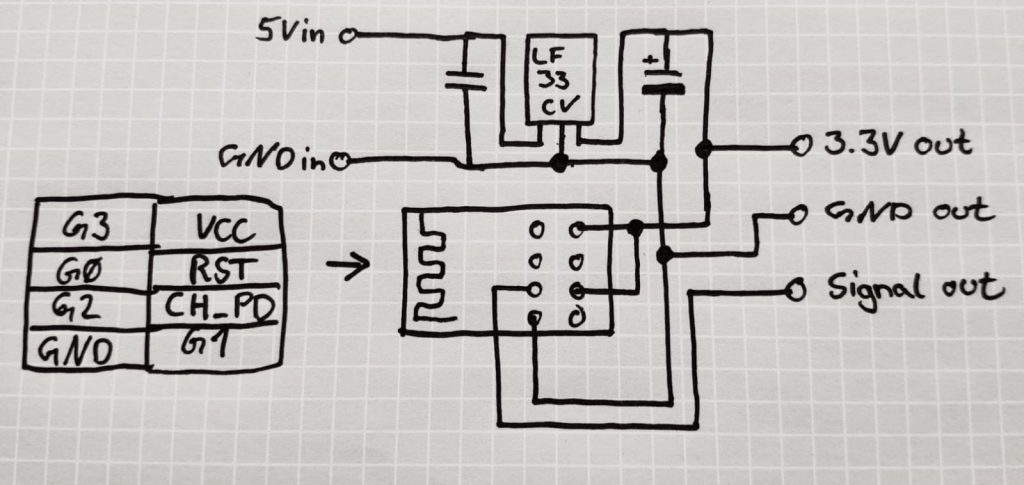
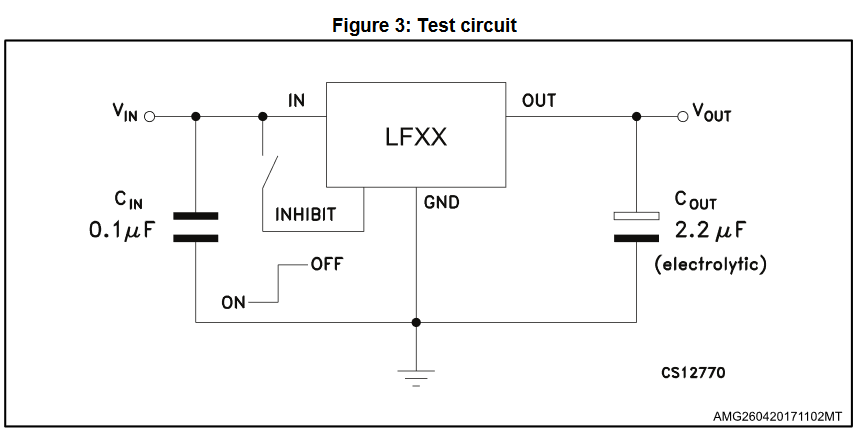
Die Testschaltung des LF33CV mit einem 0,2uF Kerko und einem 2,2uF Elko habe ich direkt auf meine Schaltung übertragen, was gut funktioniert.
Um den Taster zu „betätigen“, braucht man einen Ausgang des ESP8266. Ich verwende GPIO 2. GPIO 0 sollte man nicht verwenden, denn dieser wird durch die Platine des Fritzbox-Tasters auf GND gezogen und der ESP startet die ganze Zeit im Programmiermodus. Das kann einen schon mal Kopfzerbrechen bereiten, wenn man nicht dran denkt…Also hab ich gehört…
Den Taster „betätigt“ man, indem man einen HIGH-Pegel auf einen Testpunkt auf der Rückseite der Platine bringt. Dazu habe ich einfach ein Kabel auf diesen Testpunkt gelötet. Die Spannungsversorgung des Tasters erfolgt auch über Testpunkte, dort werden einfach die 3,3V des ESP´s verwendet. Unten ist ein Bild des PCB´s mit den aufgelöteten Kabeln auf den Testpunkten.
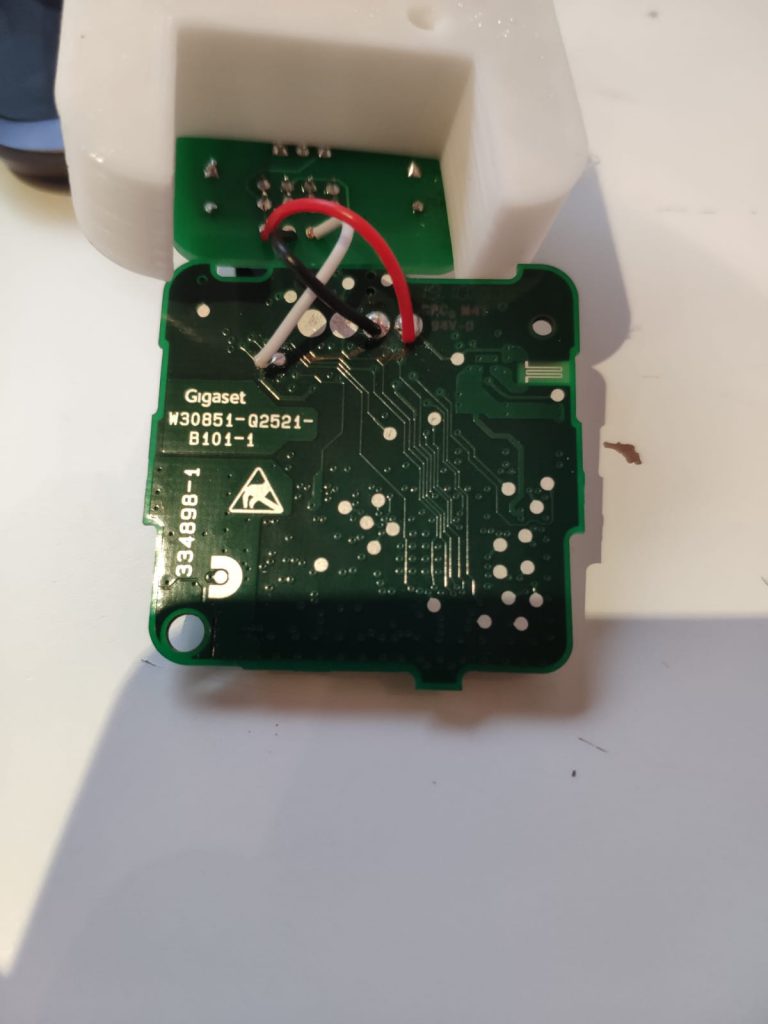
Rot = VCC
Schwarz = GND
Weiß = Signal
Software
Ich habe den „home-indicator“ Sketch von René Vollmer als Vorlage genommen und ihn auf meine Bedürfnisse angepasst.
/**
 * home-indicator.ino
 *  René Vollmer
 *  Example code for the home-indicator-project [ https://www.instructables.com/id/Who-Is-Home-Indicator-aka-Weasley-Clock-Based-on-T ].
 *  Please adjust your data below.
 *
 *  Created on: 09.12.2015,
 *  latest update: 10.12.2018
 *
 *  Hanna Lieding
 *  changed code: 30.01.2019
 *  changes:
 *  - just using one user with multiple MACs
 *  - Added code in the loop-function to trigger the DECT400
 *
 *
 */


#if defined(ESP8266)
  //Imports for ESP8266
  #include <ESP8266WiFi.h>
  #include <ESP8266WiFiMulti.h>
  #include <ESP8266HTTPClient.h>
  ESP8266WiFiMulti WiFiMulti;
#elif defined(ESP32)
  //Imports for ESP32
  #include <WiFi.h>
  #include <WiFiMulti.h>
  #include <HTTPClient.h>
  WiFiMulti WiFiMulti;
#endif

#include <tr064.h>

//-------------------------------------------------------------------------------------
// Put your router settings here
//-------------------------------------------------------------------------------------

// Wifi network name (SSID)
const char* wifi_ssid = "your_ssid";

// Wifi network password
const char* wifi_password = "your_password";

// IP address of your router. This should be "192.168.179.1" for all FRITZ!Boxes
const char* IP = "your_routers_ip";

// Port of the API of your router. This should be 49000 for all TR-064 devices.
const int PORT = 49000;

// The username if you created an account, "admin" otherwise
const char* fuser = "your_username";

// The password for the aforementioned account.
const char* fpass = "your_password";

// Put the settings for the devices to detect here
//   The number of different people/user you want to be able to detect
const int numUser = 1;

//   The maximum amount of devices per user
const int maxDevices = 2;

const int interval = 1000; // the interval of checking for MACs in milliseconds

/*
 * The array of macs. Structure:
 * = {{"mac1:user1", "mac2:user1", ..., "macX:user1"}, {"mac1:user2", "mac2:user2", ..., "macX:user2"}, ..., {"mac1:userY", "mac2:userY", ..., "macX:userY"}};
 * Doesn't matter if upper or lowercase :)
 */
const char macsPerUser[numUser][maxDevices][18] = {{"MA:C:AD:RE:SS:01", "MA:C:AD:RE:SS:02"}}; //User1, two devices

/*
 * The pins for the LED output the users
 * Look these pins up. They might depend on your board.
 * Default is {5, 4, 0, 2}, which are the D1, D2, D3, D4 (in that order) pins of the MCU ESP8266 board.
 * (Adjust this to the amount of users you have :))
 */


int button = 2; // GPIO 2 is used to trigger the DECT400


boolean _2ndtest;

//-------------------------------------------------------------------------------------


// Do not mess with these :)
// TR-064 connection
TR064 connection(PORT, IP, fuser, fpass);
// Status array. No need to change this!

bool onlineUsers;
bool onlineUsers_beforecheck;

// Array-settings. No need to change these!
const String STATUS_MAC = "MAC";
const String STATUS_IP = "IP";
const String STATUS_ACTIVE = "ACTIVE";
const String STATUS_HOSTNAME = "HOSTNAME";
const int STATUS_MAC_INDEX = 0;
const int STATUS_IP_INDEX = 1;
const int STATUS_ACTIVE_INDEX = 3;
const int STATUS_HOSTNAME_INDEX = 2;


//###########################################################################################
//############################ OKAY, LET'S DO THIS! #########################################
//###########################################################################################

void setup() {
  _2ndtest = false;
  // You might want to change the baud-rate
  Serial.begin(115200);
  if(Serial) Serial.setDebugOutput(true);

  // Clear some space in the serial monitor.
  if(Serial) {
    Serial.println();
    Serial.println();
    Serial.println();
  }

  //Define the pins for the LEDs as outputs.
    pinMode(button, OUTPUT);
    digitalWrite(button, HIGH);

    onlineUsers_beforecheck = false;


  // **************************************************
  // Wait a few secs for warm-up (dunno why, was in the default code for http connections).
  // You might be able to remove this block
  for(uint8_t t = 4; t > 0; t--) {
    if(Serial) Serial.printf("[SETUP] WAIT %d...\n", t);
    if(Serial) Serial.flush();
  }
  // **************************************************


  // Connect to wifi
  WiFiMulti.addAP(wifi_ssid, wifi_password);


  // Wait for the wifi to connect and flash all LEDs
  while ((WiFiMulti.run() != WL_CONNECTED)) {yield();}

  // Initialize the TR-064 library
  // (IMPORTANT!)
  if(Serial) Serial.printf("Initialize TR-064 connection");
  connection.init();

  // Request the number of (connected) Wifi-Devices
  int numDev = getWifiNumber();
  if(Serial) Serial.printf("WIFI has %d (connected) devices.\n", numDev);

  // Check the status of all the devices connected to wifi
  getStatusOfAllWifi(numDev);

  // Get the number of all devices, that are known to this router
  numDev = getDeviceNumber();
  if(Serial) Serial.printf("Router has %d known devices.\n", numDev);
}

void loop() {
    // Check for all users if at least one of the macs is online
    for (int i=0;i<numUser;++i) {
      if(Serial) Serial.printf("> USER %d -------------------------------\n",i);
      boolean b = true; //No online device found yet
      // Check all devices
      for (int j=0;j<maxDevices && b;++j) {
        // Get the mac of the device to check
        String curMac = macsPerUser[i][j];
        b = (curMac!=""); //If it is empty, we don't need to check it (or the next one)
        if (b) {
          // okay, ask the router for the status of this MAC
          String stat2[4][2];
          getStatusOfMAC(curMac, stat2);

          // aaaaaaaaaaaannd??? Is it online?
          if (stat2[STATUS_ACTIVE_INDEX][1] != "" && stat2[STATUS_ACTIVE_INDEX][1] != "0") {
            onlineUsers = true;
            b=true;
          }
          // Okay, print the status to the console!
          verboseStatus(stat2);
        }
      }
    }
    if(Serial) Serial.println("-------------------------------------------");

      if (onlineUsers == true && onlineUsers_beforecheck == false && _2ndtest == true) {
        digitalWrite(button, HIGH);
        delay(500);
        digitalWrite(button, LOW);
        onlineUsers_beforecheck = onlineUsers;
        _2ndtest = false;
      }
      if (onlineUsers == false && onlineUsers_beforecheck == true && _2ndtest == true) {
        digitalWrite(button, HIGH);
        delay(5000);
        digitalWrite(button, LOW);
        onlineUsers_beforecheck = onlineUsers;
        _2ndtest = false;
      }
      if(onlineUsers == onlineUsers_beforecheck && _2ndtest == true){
        _2ndtest = false;
      }
      if(onlineUsers != onlineUsers_beforecheck && _2ndtest == false){
        _2ndtest = true;
      }
    onlineUsers = false;

    delay(interval);//the ESP checks every Second for the MAC-Adresses
}


/////////////////////////////////////////////////////////////////////////////////////////////////
//////////////////////////////////// helper methods//////////////////////////////////////////////
/////////////////////////////////////////////////////////////////////////////////////////////////

/**
 *  Get the number of devices that were connected to the WIFI lastly
 *  (some of them might not be online anymore, you need to check them individually!)
 *  return (int)
 */
int getWifiNumber() {
  String params[][2] = {{}};
  String req[][2] = {{"NewTotalAssociations", ""}};
  connection.action("urn:dslforum-org:service:WLANConfiguration:1", "GetTotalAssociations", params, 0, req, 1);
  int numDev = (req[0][1]).toInt();
  return numDev;
}

/** Print the status of all devices that were connected to the WIFI lastly
*  (some of them might not be online anymore, also gets you the hostnames and macs)
*  return nothing as of yet
 */
void getStatusOfAllWifi() {
  getStatusOfAllWifi(getWifiNumber());
}


/**
 *  Print the status of all devices that were connected to the WIFI lastly
 * (some of them might not be online anymore, also gets you the hostnames and macs)
 * return nothing as of yet
 */
void getStatusOfAllWifi(int numDev) {
  //Query the mac and status of each device
    for (int i=0;i<numDev;++i) {
      String params[][2] = {{"NewAssociatedDeviceIndex", String(i)}};
      String req[][2] = {{"NewAssociatedDeviceAuthState", ""}, {"NewAssociatedDeviceMACAddress", ""}, {"NewAssociatedDeviceIPAddress", ""}};
      connection.action("urn:dslforum-org:service:WLANConfiguration:1", "GetGenericAssociatedDeviceInfo", params, 1, req, 2);
      if(Serial) {
        Serial.printf("%d:\t", i);
        Serial.println((req[1][1])+" is online "+(req[0][1]));
        Serial.flush();
      }
    }
}

/**
 *  Get the status of one very specific device. Only works if it is a WIFI device!
 * return nothing, but fills the array r
 */
void getStatusOfMACwifi(String mac, String (&r)[4][2]) {
  // Ask for one specific device
    mac.toUpperCase();
    String params[][2] = {{"NewAssociatedDeviceMACAddress", mac}};
    String req[][2] = {{"NewAssociatedDeviceIPAddress", ""}, {"NewAssociatedDeviceAuthState", ""}};
    connection.action("urn:dslforum-org:service:WLANConfiguration:1", "GetSpecificAssociatedDeviceInfo", params, 1, req, 2);
    if(Serial) {
        Serial.println(mac + " is online " + (req[2][1]));
        Serial.flush();
    }
    r[STATUS_MAC_INDEX][0] = STATUS_MAC;
    r[STATUS_MAC_INDEX][1] = mac;
    r[STATUS_IP_INDEX][0] = STATUS_IP;
    r[STATUS_IP_INDEX][1] = req[0][1];
    r[STATUS_HOSTNAME_INDEX][0] = STATUS_HOSTNAME;
    r[STATUS_HOSTNAME_INDEX][1] = "";
    r[STATUS_ACTIVE_INDEX][0] = STATUS_ACTIVE;
    r[STATUS_ACTIVE_INDEX][1] = req[1][1];
}

/**
 *  Get the number of devices that were connected to the router (ever)
 *  (some of them might not be online, you need to check them individually!)
 *  return (int)
 */
int getDeviceNumber() {
  String params[][2] = {{}};
  String req[][2] = {{"NewHostNumberOfEntries", ""}};
  connection.action("urn:dslforum-org:service:Hosts:1", "GetHostNumberOfEntries", params, 0, req, 1);
  int numDev = (req[0][1]).toInt();
  return numDev;
}

/**
 *  Get the status of one very specific device. May contain less information as the same option for WIFI.
 * return nothing, but fills the array r
 */
void getStatusOfMAC(String mac, String (&r)[4][2]) {
  //Ask for one specific device
    String params[][2] = {{"NewMACAddress", mac}};
    String req[][2] = {{"NewIPAddress", ""}, {"NewActive", ""}, {"NewHostName", ""}};
    connection.action("urn:dslforum-org:service:Hosts:1", "GetSpecificHostEntry", params, 1, req, 2);
    if(Serial) {
        Serial.println(mac + " is online " + (req[1][1]));
        Serial.flush();
    }
    r[STATUS_MAC_INDEX][0] = STATUS_MAC;
    r[STATUS_MAC_INDEX][1] = mac;
    r[STATUS_IP_INDEX][0] = STATUS_IP;
    r[STATUS_IP_INDEX][1] = req[0][1];
    r[STATUS_HOSTNAME_INDEX][0] = STATUS_HOSTNAME;
    r[STATUS_HOSTNAME_INDEX][1] = req[2][1];
    r[STATUS_ACTIVE_INDEX][0] = STATUS_ACTIVE;
    r[STATUS_ACTIVE_INDEX][1] = req[1][1];
}


/**
 * Prints the status of the device on the screen (arrays r of the getStatusOfMAC methods).
 * return nothing
 */
void verboseStatus(String r[4][2]) {
    for (int i=0;i<4;++i) {
      if(Serial) Serial.print(r[i][0]+"="+r[i][1]+", ");
    }
    if(Serial) Serial.print("\n");
}
Hallo,
ich möchte am DECT 400 eigentlich nur einen externen Taster anschließen der von der Briefkastenanlage kommt (Ist Potentialfrei). Kann ich hierzu auch die Testpunkte verwenden? da bei den intern verbauten SMD Tastern wenig Platz vorhanden ist.
Für die Hilfe schon mal besten Dank im voraus
Hallo,
ja das ist auch möglich.
Dafür müsstest du den Taster zwischen dem VCC-Testpunkt und dem Testpunkt vom Schaltsignal schalten.
Grüße Johannes
Hallo,
kann man auch eine Türklingel (alter Drücker, kein Taster) mit den Testpunkten des DECT 400 schalten? Möchte gerne, dass die Fritzbox einen Gruppenanruf tätigt, wenn die Türlingel gedrückt wird. Ich würde das Gerät mit der enthaltenen Batterie betreiben und nur das Klingelsignal extern anschließen wollen. Das heißt, den 8V Trafo abklemmen und die Kabel bis zum Gong durchschleifen. Da dann den DECT 400 platzieren. Wären das dann auch VCC und Signal?
Danke im Voraus
Gruß Jan
Hallo Jan,
du müsstest dafür den einen Kontakt des Drückers mit dem VCC Testpunkt und den anderen Kontakt mit dem Signal Testpunkt verbinden. So schaltest du deinen Klingeldrücker parallel zu den Microtastern auf dem DECT 400. Falls noch Fragen aufkommen kannst du gern nochmal kommentieren oder auf unseren Discord-Server kommen.
Grüße
Johannes
Hallo Johannes,
könnte man VCC / Signal eventuell auch mit einem Optokoppler durchschalten, um den DECT 400 mit einer anderen Spannung (z.B. 24V) anzusteuern?
Danke und schöne Grüße,
Hans
Hallo Hans,
über einen Optokoppler kannst du die Spannung ebenfalls durchschalten.
Grüße
Johannes
Hallo Johannes,
vielen lieben Dank für deine schnelle Antwort – mit wieviel Strom muss man denn hier ca. rechnen?
Schöne Grüße,
Hans
Dafür braucht man doch keinen Dect400. Für eine Klingelerkennung und Meldung an einem Telefon(intern oder extern) oder Gruppenruf braucht man nur einen ESP8266 NodeMCU, eine Diode, einen Optokoppler und einen Widerstand. Auf den NodeMCU kommt ein Wifi-Client, ein Sip-Client. Optokoppler zwischen RST und GND, den Rest davor und alles parallel zur Klingel. Wenn der NodeMCU aufwacht, verbindet er sich per WLAN mit der Fritte, meldet den SIp-Client an und ruft die vorher eingestellte Rufnummer an. Auf dem Telefon siehst du dann den Namen des Sip-Clients, z.B. „ESP-Klingel“. Nebenbei kannst du noch ein Dect200 schalten und das ganze nach vorkonfigurierter Zeit, z.B. 4 Sekunden wieder automatisch enden lassen und der NodeMCU geht wieder schlafen. Wäre Schwachsinn, xtra dafür für 40€ ne Dect400 zu kaufen. Der ganze Kram kostet keine 10€ zusammen und max. 30 Min Basteln und programmieren.
Hallo zusammen,
ich sitze irgendwie auf dem Schlauch. Möchte gerne eine externe Taste (Klingelknopf) an den Dect400 anschließen und dazu die Testpunkte nehmen. VCC habe ich gefunden, wenn ich von hinten auf den Dect400 schaue, ganz rechts. Aber welches ist der andere Testkontakt?
Kann mir das jemand sagen?